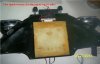
DJnRF, you should have seen the manual before I adjusted the levels. It was bad, even know the unit was new it still had several years on it and faded quiet a bit. I even cleaned page creases and remove the bleed through from the scanner light. Looks clean, now I just need to program a database to keep all these docs in. I have been designing one for a bit now, I just don't have the time I wish I did to do all my side projects.
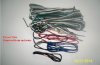
As for the wires, I totally understand. I have roughly 30 or so used Cycle Sound and Vetter Sound units. I have seen some crazy stuff when I opened these units up. I mean crazy, I have found, spiders, toys, pencils, pens, I even found somebody used a pen cap as a wire nut. I have also seen the excessive amount of wire crammed into the unit. I opened one a while back somebody filled with expandable foam. Pretty much ruined.
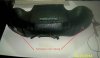
The antenna can be repaired, however it will be ugly. You know the principle on how that thing works being in communications. I always found the externals worked way better then then internal, however your housing doesn't have the external hole. BUT, I think it has the mount surface, it may just not be drilled, I cant remember all these things, though I try.
Myself I find to be so anal, that I solder and shrike tube everything, followed by pretty petite wire tires.
Madness!


Well, the copy you sent is a whole bunch better than what I had gotten. I can even read yours without having to
use a photo program to clean it up and sharpen lettering. You obviously did a good job on an old paper manual.
Having a site in which such documents are saved to help people is a good idea. The only site, relating to cycle
things, is one whee there are a bunch of manuals for the Honda Clarion radios. There are quite a few manuals
there, actually.
Well, the antenna is working, but I am sure that it is only good for strong signals. I am getting signals fairly
well here, but how it would do in actual service on the motor, I am not sure. I may hook it all up in the
enclosure, throw it on the seat of my truck and take it for a ride. (It would be nice to listen to sounds in my
truck as it doesn't have a radio. Hmmm, wonder if there is a radio man around who would install one? lol)
Now, about that mount on the enclosure for an external antenna. NOPE. There isn't one on the Cycle Sound
enclosure. Specifically made for the Laminar antenna, the mould did not use that feature on this. I do,
however, have the original Honda antenna mounted on the rear. I need to get a replacement as the top
half is missing. It might still work if I can find where the cable ends. Since it is original to the motor, I am
sure that the enclosure was used for a radio from either the dealer, or Honda when new. I find no evidence
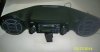
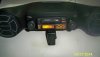
that the Clarion system was ever before mounted on the motor. I did get a Clarion type I radio, which only
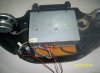
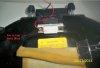
has the AM/FM radio, and the intercom, but it is missing the 'Booster". I have ordered what I think is the
right unit from a guy. Everyone always confuses those parts as to be the Power Amplifier from the type II.
The type II radio system is completely different and can have the AM/FM radio, cassette, CB radio, and
the Intercom. It also must have a multichanger box for all these to plug into. Different years required
different mountings for all the components. The type I is much easier, and gives all I want without using
up some of my fairing storage compartments. It just has the one compartment used just for the radio and
contol unit. The booster is mounted on the fairing behind the guages.
I, too, believe in soldering wires. I don't always use the heat shrink tubing. With some wires the tape is
good enough, and allows much easier changes.
When I get the unit cleaned up and looking the way it should (it is pretty cruddy right now) I will take
some pics to post here. I will let you know when I do.
Thanks again,
Dave.